How to run the JShaft Project ?
Overview
Currently, a single architecture is supported : A cluster composed of two tiers.
- One is for Web (Apache v2)
- The other one for Web Containers (JOnAS or Tomcat)
This kind of cluster offers :
- Fail Over : If one of the nodes breaks down, the cluster still running and the HTTP session isn’t lost.
- LoadBalancing : The load is balanced to several servers (RoundRobin Algorithm)
- Scalability : An extensive number of servers can support a heavy load
To create and configurate a cluster with JShaft, you have to follow three mains steps as described below :
Write the configuration file
The configuration file is a XML file that represents two separate things :
- one to describe the architecture of the cluster, which means number of tiers, of nodes for each tiers and information that identify nodes (like IP address and network name)
- another one to describe what do you want to do with this cluster
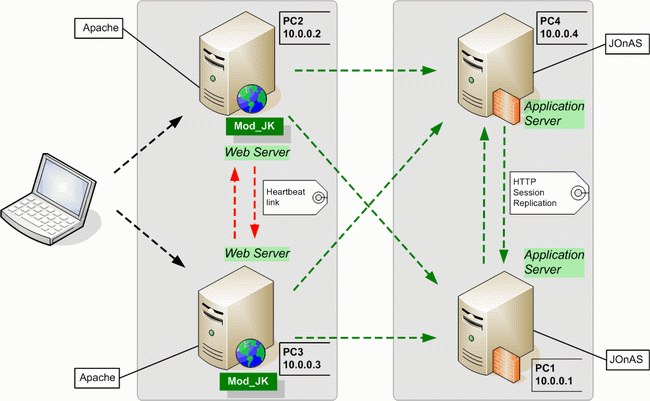
Imagine this case :

As you can see, the first tier is composed of two http servers, the second of the application servers.
- First tier : Apache HTTP Server
- Second tier : JOnAS Application Server
The representation into the XML configuration file is described below :
<?xml version="1.0" encoding="UTF-8"?>

<!-- The 'configuration' element has two parts :
		- one to describe a particular configuration of servers
		- another one to describe the configuration to construct -->
<!-- Hypothesis :
    - A node name is into a single clusterTier
    - A node name is used once -->
<configuration xmlns:xsi="http://www.w3.org/2001/XMLSchema-instance" xsi:schemaLocation="conf.xsd">
 <!-- Description of the complete network and software configuration -->
 <configuration_description>
  <!-- Single cluster : a cluster is composed of many cluster tier -->
  <cluster>
   <!-- often HTTP server like Apache with mod_jk module -->
   <clusterTier id="tier1">
    <node name="pc3" ip_address="10.0.0.3">
     <!-- Component listing -->
     <components>
      <!-- Must be absolute path (Windows or Unix) -->
      <component name="apache" basedir="/usr/local/apache2"/>
     </components>
    </node>
    <node name="pc2" ip_address="10.0.0.2">
     <!-- Component listing -->
     <components>
      <!-- Must be absolute path (Windows or Unix) -->
      <component name="apache" basedir="/usr/local/apache2"/>
     </components>
    </node>
   </clusterTier>
   <!-- many applications servers, two nodes here -->
   <clusterTier id="tier2">
    <!-- First node -->
    <node name="pc4" ip_address="10.0.0.4">
     <!-- Component listing -->
     <components>
      <component name="jonas" basedir="/home/phdezann/JONAS_4_7_4"/>
     </components>
    </node>
    <!-- First node -->
    <node name="pc1" ip_address="10.0.0.1">
     <!-- Component listing -->
     <components>
      <component name="jonas" basedir="/home/phdezann/JONAS_4_7_4"/>
     </components>
    </node>
   </clusterTier>
  </cluster>
 </configuration_description>
 <wished_configuration>
  <feature name="loadbalancing_Apache_ModJK" idref="tier1"/>
  <feature name="jonas_HTTP_session_replication" idref="tier2"/>
 </wished_configuration>
</configuration>
Before running JShaft, you have to install Apache and JOnAS. These installations aren’t automatic yet which means that you have to download and configure each server. But, don’t worry, we're here !
Install components
For each server described in the configuration file, you must install the component mentionned in the node element.
If your configuration file looks like
   ...
    <node name="pc3" ip_address="10.0.0.3">
     <!-- Component listing -->
     <components>
      <!-- Must be absolute path (Windows or Unix) -->
      <component name="apache" basedir="/usr/local/apache2"/>
     </components>
    </node>
   ...
You must intall Apache on the pc3 node (network name) with ip address 10.0.0.3. Apache must be installed into /usr/local/apache2directory.
Installing Apache on PC2 and PC3
To install Apache, you need to follow these steps :
First, download the file httpd-2.2.2.tar.gz
The installation is simple :
tar -xvzf httpd-2.2.2.tar.gz
cd httpd-2.2.2/
./configure --prefix=$HOME/apache2 --with-port=80
make
make install
To start or stop Apache :
$HOME/apache2/bin/apachectl start
$HOME/apache2/bin/apachectl stop
Installing JOnAS on PC1 and PC4
First, download the file jonas4.7.4-tomcat5.5.15.tgz
The installation is also simple :
tar -xvzf jonas4.7.4-tomcat5.5.15.tgz
export JONAS_ROOT=$HOME/JONAS_4_7_4
To start or stop JOnAS :
jonas start
jonas stop
Run JShaft
Download JShaft files here : Download Section
On Unix :
$> sh JShaft.sh
On Windows :
C:\> jshaft.cmd
The program should produce a log trace.
Test the correct behaviour of the cluster
Deploy a sample web application
To test the cluster, you can deploy a sample web application (from the sources of Tomcat). It contains JSP files who creates an HTTP session. The two applications must be different in order to distinguish nodes.
Put the file testServletSession.war into directory $HOME/JONAS_4_7_4/webapps/autoload for PC1.
Put the file testServletSession.war into directory $HOME/JONAS_4_7_4/webapps/autoload for PC4.
Result
Start Apache and JOnAs
On PC1 and PC4
jonas start
On PC2 and PC3
$HOME/apache2/bin/apachectl start
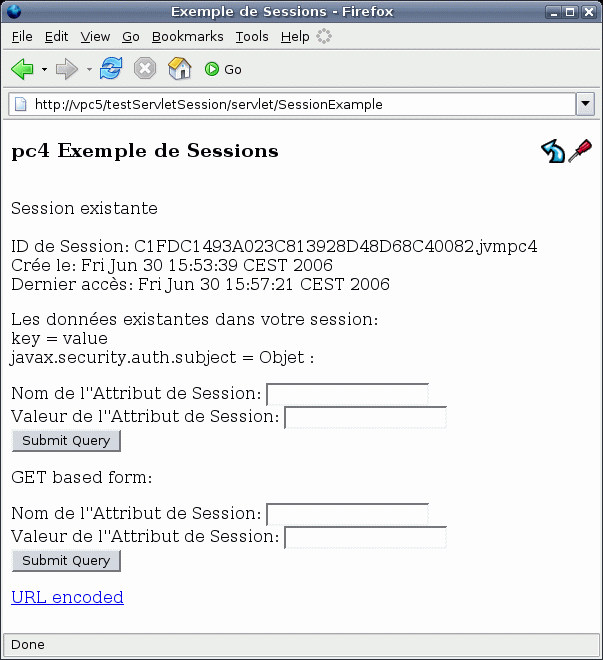
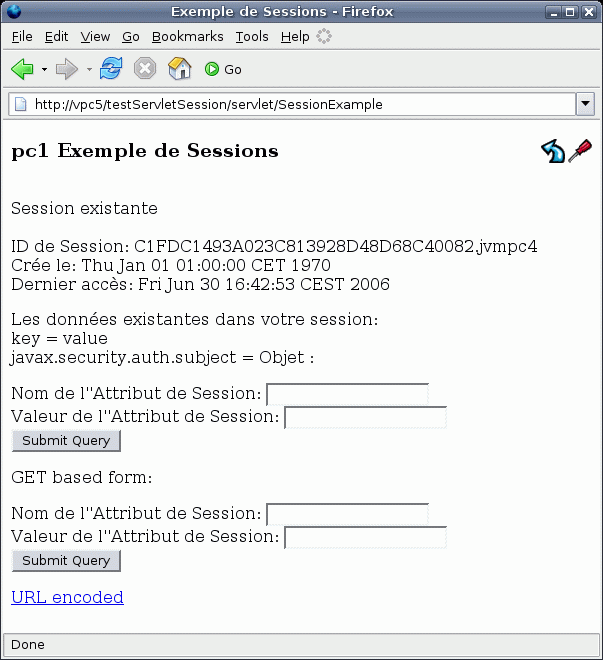
Screenshots:


